10.22.2015

Doggie Collar + Matching Bowtie

Fall is my favorite time to craft because this season is pretty much about being cozy and comfortable and there's nothing more comfy than being knee deep in a project at home.  Unfortunately this weather that we are experiencing has not passed its summer phase this year and its really annoying.  I am still waiting for the moment I can wear my boots and scarves without sweating my ass off by the time noon comes around.  Seriously, when??  I've been attempting to continue working on the Vasarely blanket that I started eons ago but it is way too warm to work with all that yarn. :-(

With that said, I made something a little less warm.  I had this idea that I should make my dog some collars in theme with the season/occasion/etc.  So I wanted to start with one for fall.  I really wanted to make one with turkeys on it (because I LOVE THANKSGIVING), but couldn't find fabric or ribbon with a small enough print to fit on a 3/4" wide nylon webbing.  I've seen cute printed collars being sold on etsy for $10-30 depending on the materials used, so the fact that I can make them myself kicks ass.  The materials that I purchased for this product didn't cost much,  so it is way cheaper than buying one from etsy. It helps that craft/fabric stores have some sort of coupon going around, too.  In the dog collar making future, I'm going to try and find the materials online since the selection at the fabric store is very limited.


I really like how it came out. I realize I can just make it custom fit to my dog, but I like the look and idea of the adjustable collar, plus I just really wanted to attempt it.  I modeled the construction from Mochi's usual collar but being this is my first attempt, I already made some notes to modify construction for next time.  The nylon webbing makes the collar super durable, but I'd love to try making the collar just out of fabric and interfacing as well.

My dog's birthday is at the end of this month so OBVIOUSLY he needs a matching bow tie.


Fucking handsome as hell.
 

9.10.2015

New Animal Planters

I bought an animal planter shaped like a pig a while back from Daiso, and I love it.  So I had to buy these pair of bears while I was in Japantown.  Obviously, I also had to buy new succulents to use with these things, so I chose this leafy one and this other one that looks like an anemone.  Succulents are so weird, I love it.


We also have this giant laurel (bay leaf) in our backyard, and I decided to make a wreath out of it.  It's pretty convenient because they dry and you can put it in your kitchen and pluck leaves off of it whenever you are cooking.  They also smell great.  They sell this stuff at Williams Sonoma for $50, so I just had to make them for the free.


8.06.2015

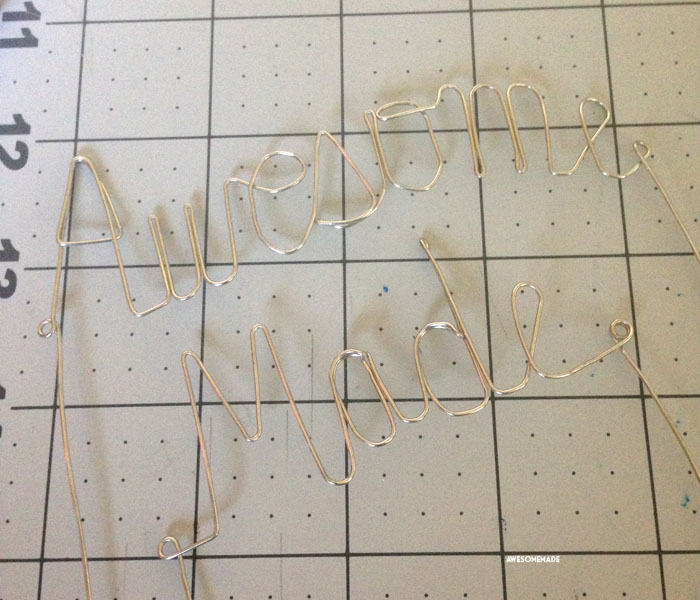
Wire Sculpting Name Plate Thingy

I made this for a dear friend of mine that recently graduated.  I knew I wanted to give her something personalized and luckily, as fate would have it,  A Beautiful Mess posted this on their blog.  Wire Sculpting!  I've done that before!  I had wire in my craft stash from a previous project (yarn wrapped name tags) but I never thought of making it as a name plate thingy (I really have no idea what to call this).  I didn't want to use sculpting clay as the base, so I found these wooden plaques at Michael's that I could drill holes in and paint.*  It's awesome, I promise, but I don't want to post it on here for anonymity purposes. So here's the second one I made for myself.  Different name, but same concept. It helps to write out the words on paper to determine the "path" of the wire to make your loops as clean as you can and to keep spacing in mind.  I made it two levels, and sculpted the wire so that the "A" can be used as a paperclip to hold notes and such.  Dual functionality!


*Always use a coupon.

7.11.2015

Vasarely Blanket (ongoing project) update #6

Alright now things are happening!  So... I'm totally not done cranking out diamonds,  but I've started constructing this blanket. YES!  I'm pretty sure I started this project last August?  So this project is almost a year old!  So much for being inspired and crafting my brains out.  I've been lazy and unmotivated but I'm trying.  After finishing up the latest batch of diamonds, I kinda laid out most of them on my bed and I must say, it's making me excited about it.


LOOK! Do you see it?? Do you the Vasarely-ness happening right now?  At this point I realized I didn't have any yarn to start joining the diamonds together, so the very next day I made a trip to Michael's and created my very first cube. How exciting!


And then I got more excited and added another cube to that cube:


And then the excitement died down after attempting to weave all those damn ends.  I cursed a little, and stopped.  I'm pretty sure weaving in those ends will be the most annoying part of the procedure.  I regret not doing them earlier.  But at least the blanket is finally coming along. :-D


7.03.2015

Nails of the Day (or Week): Houndstooth Nail Stamping

I should really use my nail stamp/plates more often.  I was going for that negative space thing that's been going on, so I just put a sheer white underneath to try and cancel out my visible nail line.  But the sheer white was a bit too sheer.  Oh well, I still like them.

Polish used:
Sheer White: OPI - Don't Touch My Tutu!
Black: Konad Stamping Polish


5.14.2015

Vasarely Blanket (ongoing project) update #5 (sort of)

I totally have been terrible with this blanket as far as progress goes.  I wanted to post an update in hopes that maybe, just maybe,  it will push me to work on it more frequently..  I have been cranking out more diamonds, about 2 1/2 skeins-worth.  But currently do not have the diamond count right now.  Once I finish this current skein, I think I will start constructing the damn thing.  My goal is to be finished with more than half of it before it gets too hot.  There's nothing worse than crocheting big things during the summer.  Its just uncomfortably warm.

okbyesorry


Updated Diamond Count: 3 skeins were done. 38 MORE DIAMONDS TO GO!

3.26.2015

Fleece Blanket (for my dog)

I wanted to make my dog a fleece blanket since he always tries to sneak up onto my bed (and I let him).  I pretty much bought whatever fleece was on sale in the remnant section at the fabric store.  I doubled the fabric so the blanket would be warm.

So I cut the fabric pieces in half, so that I can make it a good-sized blanket (if i didn't I would be left with a super long blanket, but very narrow).  I then sewed the different colored halves together to form each layer, so that the finished product will look half neon green/ half red. 

 I've tried the "no-sew" blanket once before, but to be honest, cutting all the strips around the perimeter and tying them together was such a pain.  Sewing it is way more easier (that is, if you have a sewing machine and can stitch a straight line.)

And now, my spoiled dog has his own area of my bed.  Caaayuuuuute!