Been pretty busy and fell off the dressmaking project. Started piecing together the skirt. Pretty straightforward, but had to make pleats. Glad I bought these fabric pencils.
I stopped at the basting. The next step is putting the bodice and skirt together. Gimme a minute. lol
Showing posts with label sewing. Show all posts
11.14.2017
9.17.2017
Dress Pattern - Butterick 5982 (ongoing project) updated #2
Constructing the Bodice
After finally cutting out the pieces, the next step was to start piecing them together the bodice, as well as creating darts.
Darts! What are darts? Watch 5 hundred youtube videos on how to sew a dart and you're set!
I'm not quite sure if these darts will suit me best, but I'm just going to follow the pattern and worry about it later. Besides the darts, everything else seemed pretty easy peasy. I just had to repeat my steps for the lining. Then, sew the lining to the fabric right sides together, and turn it right side out.
Putting lining in a dress is twice the work, but its looking more and more like a real dress, you guys.
Other Sewing Things That I Learned While Making this Bodice:
- Staystitching
- Understitching (I didn't know there was so much extra stitching involved in making a dress!)
- Also, as someone with no boobs, I don't need no freaking darts. I mean, I do but not as much. And for that I am thankful. (less work!)
8.30.2017
Dress Pattern - Butterick 5982 (ongoing project) updated #1
Fabric Choice and Pattern Cutting
So after I finished figuring out the pattern pieces, I had to choose some fabric. I decided since its my first dress, and I had no idea what the hell I was doing, I would pick a fabric that was safe. By safe, I mean something that wasn't too expensive (because what if this dress was an entire fail?) but something that wasn't too crazy (like, I'm not going to buy a discount fabric that had like, owls on it. What if this dress turns out really well but I can't wear it because I hate owls??) So I stuck with a black broadcloth because LBDs are a classic. I found this pink lining in the remnants bin (it turned out to be 70% off and I got a whole yard) and thought pink would be cute, minimal, with a small pop of contrast to the black.
As far as cutting out the pattern pieces, everything was pretty straightforward. I just followed the cutting layout in the instructions, making sure I knew where the grainline and the folds were where they needed to be. I put some painter's tape on the right side of each of the pieces of fabric because when it comes to solid color fabrics, both sides look the same to me.

Mistake #2: I didn't pre-wash my fabric. Meaning, if I ever wash this dress, there's a big possibility that it might shrink. Dammit. Like I literally thought about it right after I cut out ALL the pieces. Luckily, the sizing is a little big, so maybe it will magically shrink perfectly to my size? Oh well. I'm not going stress about it, I'm just going to keep telling myself that this is a learning project and its not a big deal. If this project really does fail, I'm going to buy myself a new dress. :::shrugs:::
Up next: constructing the bodice. :-O
8.19.2017
Installing a Zipper into a Travel Neck Pillow
I bought this travel neck pillow a while back after my inflatable one had a leak and wouldn't inflate anymore. I was kind of excited to see this at Target, since I've followed Design Love Fest on insta for forever. It's everything that I was looking for in a new neck pillow: memory foam, polka dot print, soft, adjustable strap, and a clip so that you can hang it on your bag. The only thing that annoyed me was that it didn't have a zipper installed so that I can remove the cover and wash it. Knowing how gross airplanes can be, a removable liner was necessary. The wash instructions for the neck pillow was just to hand wash only. But I kept thinking about if I did that, and the memory foam absorbed the water and I didn't let it fully dry, I would be stuck with mold and mildew within the pillow and etc etc.
Anyways, paranoid-ass me thought I could do either two things: make myself another lining with a zipper to cover the neck pillow OR just rip the seams of the original lining and install a zipper into it. I decided the latter because the only reason I bought this pillow was because of the fabric design, so why would I cover it up?
Anyways, long story short (sorry!) I installed a zipper into this cute ass pillow and now I can wash the lining and think of all the airplane bacteria that's not embedded onto my face.
This zipper came in a 5-pack that I bought at Daiso of all places. So worth it. If I can install zippers into everything I would. Like how I wish I could install pockets into all my dresses. (I probably could, but I'm lazy af.)
category:
neckpillow,
sewing,
zippers
8.06.2017
Following a Dress Pattern: Butterick 5982 (Ongoing Project)
So I purchased this dress pattern last year, and never started it. Until now! Ever since Hancock Fabrics closed (RIP), I haven't been into doing sewing projects since I would have to drive across the bridge to go to Joann's. This project is a long time coming, so I'm glad I broke the seal and took a look at this pattern. Unfortunately, I had already messed up before even starting it! I bought the wrong sized pattern! And since it has been a while since I purchased it, and also I'm too lazy, I had to look at the smallest size and trace 2 sizes down with a pencil. Already this extra step is annoying but at least I learned something. For some reason I thought the pattern had all the sizes on there, but it did not.
As far as following a pattern, I have done so before, but this is the first time that I'm following a pattern that isn't a one-size-fits-all sort of garment. The last time I used a pattern was for an apron. So as far as sizing, I didn't really have to be precise. Since this is a new thing for me, and I know it is a project that will probably take me a while to complete, I thought I'd make blog posts about my experience. I'm pretty much learning a lot as I go, and watching youtube videos on the pattern-following process along the way. It would benefit me if I have this experience on record for future reference, so HERE. WE. GO
So instead of cutting out the pattern straight from the pattern paper, I decided to trace it onto another paper and use that. The reason for this was I figured its a very classic dress, and I might want to make it more than once. If I cut it straight from the pattern paper that was given, it will not last that long since the paper is so thin. Also, what if I need to make one in a different size? What if I spill coffee on the paper and it disintegrates?! What if my dog eats it??! At least now, I have an og copy just in case something like that happens.
Anyways, tracing 2 sizes down, and then transferring the pattern to another piece of paper was a project in itself, so so far that is all I did.
The pattern is the Butterick 5982 dress. It includes 3 styles: One is a sleeveless boatneck dress. The second is the same thing, except the skirt has 3 tiers of color. And the last style is the same as the first but with a v-neck and short sleeves. It also has a pattern for a matching belt with a cute little bow in front. I chose to do the first style. To stay organized, I wrote down which pattern pieces were needed for that specific style, and how many fabric pieces were needed to be cut from each piece (including lining pieces). The pattern pieces already include seam allowance, so I didn't have to worry about figuring that out. (yessss)
If you are tracing a pattern onto a different piece of paper, it helps to run a highlighter onto your specific size so its easier to follow. I used a tracing wheel to transfer the cut lines to the paper. You're supposed to use carbon paper as well, but I didn't have that on hand, so I kinda had to hold the paper up to the light and see where the marks were on the paper. Lol! Just another item I needed but didn't have so I had to make it work somehow. :::adds carbon paper to Daiso shopping list::: I was also careful to transfer all the pattern notations so I don't mess it up. Some stuff I don't understand, but I guess I'll look it up later.
'Til next time!
12.23.2016
Adventures in Pattern Making - Fleece-lined Dog Jacket
One of my goals next year craft-wise is to become more comfortable with my sewing machine. I even started buying some dress patterns with the goal to successfully make my own dress in 2017. I haven't started them yet, because it's kinda intimidating. But I did make this jacket for my dog. I've made my dog a jacket before, it's not something new. I even made one using a purchased pattern. But I wasn't truly satisfied with the outcome and I knew I wanted to try it again and improve. I figured making a jacket for my dog would be a small step towards making an entire dress for me (less fabric, less time dedicated to it, less commitment), so here's what I did.
There's this jacket that I bought my dog years ago that is my favorite on him. I wanted to base this project on that specific style. It has more coverage on the dog's front section compared to those jackets that just wrap around the neck and then around the body. Anyways, I've made a pattern before using this jacket, but it didn't have any lining on it and I used snap buttons when I should've used velcro. So I decided to re-do the pattern to make it fit him better (so I can use it for future jacket-making) and then add to the overall quality of the piece with fleece lining! And velcro closures! And lengthening the coat for added modesty*! So technically it's two projects in one (making the pattern and then making the jacket with that pattern.)
I was able to get both fabrics in the remnants section of Joann's. That's the beauty of having a 12-lb dog: you don't need yards of fabric. I was lucky to find this flannel in this print, I think it looks great on him. I might even have enough leftover to make a matching cowl for me. It wouldn't be the first time.
Anyways, look how caaaa-yoooote:
The cute fleece collar is also the material used for the lining inside. I bought black bias tape and was happy with the contrast. Next time I'm going to try and make my own bias. Because custom details, yaaas.
*okay, that was a joke. but no dog looks flattering in a crop top.
category:
dog jacket,
Mochi,
patternmaking,
plaid,
sewing
8.14.2016
Rolled Hem
To continue with trying to use up my fabric stash, I had this awesome polka dot bit of fabric I wanted to make a neck scarf with. All I needed to do was finish the edges, so today I learned how to do a rolled hem by hand, since it is a more delicate fabric. My eyes hurt. Next time I'm going to buy the sewing foot made specifically for rolled hems and just use the machine. Nonetheless its a great skill to have when finishing a project.
![]() |
8.12.2016
Sewing Machine Cover
One of my goals for this month, craft-wise, is to use up more of my fabric stash. Making a dust cover for my sewing machine was on my list of stuff to make, so I figured I'd bust one out this week. It's a simple project, but a cover for your machine is necessary because dust really settles into your machine, man. It's a serious problem (not really). Dust combined with the sewing machine oil gets all gunky. Having a dust cover keeps it pretty.
Anyways, I decided to use two types of fabric (contrast!), because I wanted to match my chair cover for matchy matchy crafty room kitschiness. It'skinda tacky, but I feel like the craft room/station is the only place you can decorate all crazy and get away with it. I was about to add hot pink rickrack trim but I totally forgot about it and already sewn the side panels.
Dimensions for the finished project were 7x15x14. I cut out 2 panels for the sides (8x15), 2 panels for the front and back (16x15), and one for the top (16x8), 1 inch added for seam allowance. Easy peasy!
Matchy match, with leftover polka dot fabric to spare. What else can I make to get rid of this fabric?!
Anyways, I decided to use two types of fabric (contrast!), because I wanted to match my chair cover for matchy matchy crafty room kitschiness. It's
Dimensions for the finished project were 7x15x14. I cut out 2 panels for the sides (8x15), 2 panels for the front and back (16x15), and one for the top (16x8), 1 inch added for seam allowance. Easy peasy!
Matchy match, with leftover polka dot fabric to spare. What else can I make to get rid of this fabric?!
10.22.2015
Doggie Collar + Matching Bowtie
Fall is my favorite time to craft because this season is pretty much about being cozy and comfortable and there's nothing more comfy than being knee deep in a project at home. Unfortunately this weather that we are experiencing has not passed its summer phase this year and its really annoying. I am still waiting for the moment I can wear my boots and scarves without sweating my ass off by the time noon comes around. Seriously, when?? I've been attempting to continue working on the Vasarely blanket that I started eons ago but it is way too warm to work with all that yarn. :-(
With that said, I made something a little less warm. I had this idea that I should make my dog some collars in theme with the season/occasion/etc. So I wanted to start with one for fall. I really wanted to make one with turkeys on it (because I LOVE THANKSGIVING), but couldn't find fabric or ribbon with a small enough print to fit on a 3/4" wide nylon webbing. I've seen cute printed collars being sold on etsy for $10-30 depending on the materials used, so the fact that I can make them myself kicks ass. The materials that I purchased for this product didn't cost much, so it is way cheaper than buying one from etsy. It helps that craft/fabric stores have some sort of coupon going around, too. In the dog collar making future, I'm going to try and find the materials online since the selection at the fabric store is very limited.
I really like how it came out. I realize I can just make it custom fit to my dog, but I like the look and idea of the adjustable collar, plus I just really wanted to attempt it. I modeled the construction from Mochi's usual collar but being this is my first attempt, I already made some notes to modify construction for next time. The nylon webbing makes the collar super durable, but I'd love to try making the collar just out of fabric and interfacing as well.
My dog's birthday is at the end of this month so OBVIOUSLY he needs a matching bow tie.
Fucking handsome as hell.
category:
bowtie,
dog collar,
Mochi,
sewing
3.26.2015
Fleece Blanket (for my dog)
I wanted to make my dog a fleece blanket since he always tries to sneak up onto my bed (and I let him). I pretty much bought whatever fleece was on sale in the remnant section at the fabric store. I doubled the fabric so the blanket would be warm.
So I cut the fabric pieces in half, so that I can make it a good-sized blanket (if i didn't I would be left with a super long blanket, but very narrow). I then sewed the different colored halves together to form each layer, so that the finished product will look half neon green/ half red.
I've tried the "no-sew" blanket once before, but to be honest, cutting all the strips around the perimeter and tying them together was such a pain. Sewing it is way more easier (that is, if you have a sewing machine and can stitch a straight line.)
And now, my spoiled dog has his own area of my bed. Caaayuuuuute!
2.28.2015
Floral Eyeglasses Pouch
So it's official. I have to get glasses. I finally bit the bullet and scheduled an eye exam. The doctor gave me a prescription. Ordered some frames from Warby Parker. My prescription isn't even that strong, I just need them for driving and reading things from far distances. And for crocheting while netflix-ing. You know, important things.
So I figured since I need glasses, I should use these spring frames that I bought at a Daiso a few months back. I may have been kinda drunk while buying them, but hey, who isn't? I love Daiso. I always get hi-chew and cute stationary stuff there (multi-color pens and post-its shaped like animals) and you can always find something you didn't know you needed. If I had closer access to that place, I would go there every week. I would go there so hard.
Anyways, I found these spring frames in Daiso's craft section. I thought it was a good idea at the time to buy them but I never got around to making anything with them until now. I based the measurements off of an eyeglass case I already owned and used fabric I had laying around (black floral, with an orange lining). I also used some leftover felt inside the lining to thicken the case and make it more sturdy. I think it came out pretty well, but since the spring frames came in a 2-pack, I already know what I would change when I make the second case. I want to try and find a fabric that has eyeglasses on it. If not, I saw this fabric at Joann's the other day that had oreo cookies on it. But fake oreo cookies, because maybe Nabisco made licensed oreo cookie fabric? That makes me think of my copyright story that I wanted to blog about, but that will be another post. ;-)
category:
eyeglasscase,
floral,
sewing
2.05.2015
Planners and a DIY Pen Holder
This is barely a "project" to blog about, but I'm sure other people have had the same frustration as me of having a notebook-type planner with no pen holder available. So I made one and its great. Plus, I feel like I need to talk about planners, because I've been starting to use them again and I wanna talk about it like a nerd.
I'm kind of old school, in the sense that I need to write things down with pen and paper, rather than typing it into my phone or into a Google calendar. I've tried using to-do lists on my phone (there's an app for that!), but it's not as satisfying as writing a to-do list out on a notepad, and then crossing out the item on the list when its done. I love making lists! I also really like my own handwriting. Is that a weird brag? It's not even a humble brag, its just a weird brag. I'd show it off on instagram, but that's weird. It's a weird brag. My handwriting isn't perfect, it can be messy or neat depending on the urgency of writing something down. Hand writing in general is just familiar and personal to me, and I love that. Also, I feel like I'm the only person my age that I know that prefers cursive over print. Do kids these days even learn cursive? Is everything typed up now? Wait, what was I talking about again?
My planner/organization style is heavily dependent on three things: post-its, colored pens and highlighters. I am at a loss without this holy trinity of organization. But yeah, post-its are the best. I use that stuff for everything, in all different sizes. The only kind I dislike are the neon pink colored ones because they hurt my eyes. If I was a famous person, I would totally use my celebrity status to promote post-its in hopes that I can get a lifetime supply of post-its. If I was one of the "stars" in a Bravo TV Real Housewives series, my tagline that shows in the opening credits would be "I'm gonna need a bigger post-it." Actually it wouldn't, since that's kinda lame and I would want my tagline to be more sassy! But I say that quote from time to time at work, even though I'm the only one who laughs at it.
Last year, my planner of choice was this old Esprit planner. (Does Esprit still exist?) It was the 6-ring binder style kind, personal-sized. I liked the size of it, it had a week on one page, which was perfect since I don't need that much writing space and I would just stick post-it notes on it anyways. I ran out of planner paper though, and the binder is kind of falling apart, so I decided to try something new this year. I found a "leather"-bound planner at Marshall's for only $5. The layout is a week on two pages, which is kind of too much space for me, but it was $5 so whatever. It's slim, which I like since my old planner was bulky. My biggest gripe is that the monthly calendars start the week off on a Monday, when I am used to calendars that start the week on a Sunday. You would think that it wouldn't be such a big deal, but I've been writing stuff down in the wrong box. It throws me off. But I deal.
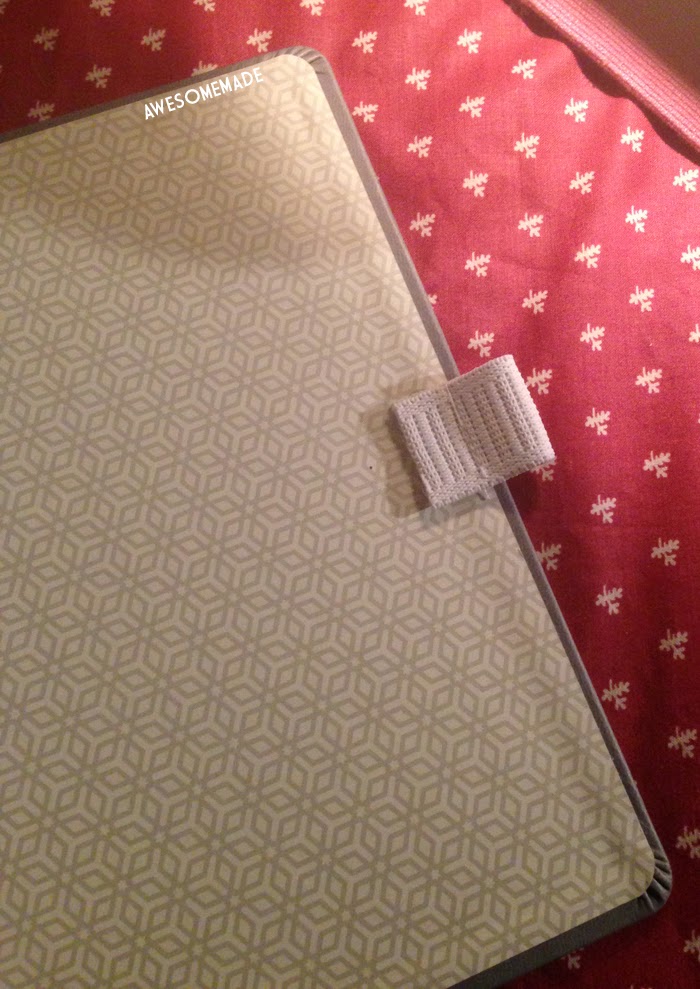
The other gripe I had about this planner is that it doesn't have a loop to hold your pen. What good is a planner if you forget a pen to write stuff in it? So I made one with a piece of elastic that I sized around my favorite pen. If you size it around your smallest-sized pen that you use, it'll accommodate all your pens since its stretchy (duh.) I just stitched across the elastic to form a loop, cut the excess elastic off, and attached it to the inside of the back cover with a hot glue gun. Problem solved!
The elastic that I had on hand was kind of thick because it was what I had laying around. I would recommend buying a thinner elastic for this project because you don't really need the heavy duty kind to secure a friggin' pen. Elastic comes in so many colors now, making a diy pen holder is a great way to personalize your planner.
11.11.2014
Zipper Pouch w/ Scallop trim
Zipper pouches are always something I need. My organization system pretty much consists of ziploc bags and post-its, so zipper pouches are kind of like fancy reusable ziploc bags. Sometimes I purchase makeup sets because of the free makeup pouch (clinique bonus time, anyone??). I use them to store everything. Every. Single. Thing. Crochet needles! Instruction manuals! Sticker collection! Charger cables! Manicure kit! Etcetera! Can compartmentalizing things into bags be considered a passion?? As long as its not compartmentalizing your life. Uhhhh.. Sorry, that took a weird turn.
My point is, I made this zipper pouch with plans on making more and more and more of them in the future, because I just can't get enough. It is a great way of getting rid of your scrap fabric. I like the combo of the neutral taupe/purple fabric with the pop of orange color used for the inner lining. I found the scallop trim at Target at the dollar spot area and it was marked down even more, so I had to get it. I'm glad I finally got to use it for something.
Next time I am going to try different shapes with the same fabric, so its like having my very own line of fancy ziploc bags.
category:
scallop,
sewing,
zipperpouch
11.07.2014
Doggie Bowties
Not exactly an original craft idea, but necessary and cute. The past bowties that I've made for Mochi were finished by hand, but I decided to finish this one off using a hot glue gun (used a sewing machine to finish the individual parts, but used hot glue to attach the elastic loop on the back.) Omg, this was way easier. Sometimes I wish he was a girl so I can dress him up, but these bowties will suffice.
He celebrated his 6th birthday last week:
Mochi wore this orange bowtie for good luck throughout the NLCS and the World Series games. I'm kinda superstitious (I've been wearing orange nail polish since September 29.) so I never took it off him until the very end:
He wore it when the Giants won the whole thing in 2012, too. So I will keep this for 2016, just in case. ;-)
1.16.2014
Plaid Cowl
Got this awesome plaid wool blend fabric on sale for only $2.38 a yard! Usually it's like $15+. I bought a yard of it with enough leftover to make a jacket for my dog. I love making these cowl neck "scarves" because they are super easy to make (sewing in straight lines!), long enough to block all the cold air out from your neck and are dual layered so they are super warm. Plus they are easy to pack in a bag compared to regular scarves. I think the next time I will make some, I will use two different fabrics so it can be reversible. And maybe add a pom pom trim just because I want a reason to buy pom pom trim.
My only mistake was not washing the fabric prior to making the scarf. It smells like fabric store. Aka kinda musty. Hopefully it will air out and not smell that way.
I've stopped making new years resolutions, but I do plan to craft more this year. I am optimistic that this blog will be updated more. Lets hope.
10.31.2013
Halloween Unicorn Costume
I've been wanting to be a unicorn (for Halloween) since forever. Most of the unicorn costume tutorials are of the "sexy unicorn" variety, but there were some cute (and comfy) Pinterest posts that were inspiring enough for me to make my own costume.
Stuff I used:
Stuff I used:
Subscribe to:
Posts (Atom)