5.25.2017

Gilmore Girls-themed Bachelorette

For my best friend's bachelorette, we headed to NOLA for the weekend.  It was such an amazing trip.  NOLA is definitely a place I would revisit, just for the fried chicken alone.

Anyways, the bride to be is a huge Gilmore Girls fan, so she requested a Gilmore Girls theme for her bach.  Challenge. Accepted.

At first I thought incorporating Gilmore Girls into a raunchy bachelorette weekend in New Orleans would be weird, since there didn't seem to be an obvious connection between GG and NOLA (EXCEPT ZYDECO). But I realized I was just overthinking it.  Not everything has to blend together theme-wise in a bachelorette party.  A bachelorette party is just a regular party but with an inflatable penis added to the mix (and in this case, penis straws and penis candles (also, I can't believe I just said penis on my blog)).  

Whenever I searched Pinterest for Gilmore Girls bachelorette parties, there wasn't that much content specifically for a bach, but just for regular viewing parties.  So to be honest, I'm posting this on here and adding it to Pinterest to fill that Gilmore Girls-themed bachelorette void.  To keep with the theme, but make it personalized for the bride,  I made Team Dean/Logan/JESS buttons, but photoshopped her face onto the pins.  Not enough Team Jess fans like me in our party tbh, but its okay.


We also wanted souvenir shirts for the occasion.  If you search bachelorette party shirts online there would be cute ones that say "Bride Tribe" or even NOLA themed ones like "Bourbon Bach " or whatnot.  All of those are cute and all, but me being me needed something more personalized, and something that went with the theme.  So I designed Kirk shirts!  But instead of "Babette Ate Oatmeal",  I made it refer to the bride saying YAAAS.  (If you are wondering what font Kirk uses for his shirts and his films, its Arial.)

Here is the Kirk shirt reference.  Is he underrated? I think so.  I think he hustles hard but still manages to be an idiot and like that about him. lol.  Anyways, I love Stars Hollow.


I loved them so much.  I used uberprints.com since I've always used them during my coaching days and had no problem with them.  My only con about the shirts would be the fabric wasn't as soft as I wanted them to be compared to the shirts I ordered from them before.  I also had an issue with one shirt having the design smudged, but customer service was great and they sent me a replacement shirt.  Delivery was really fast for custom shirts, especially when you order digital screenprinting.


As far as other Gilmore Girls theme bach ideas, we decorated the airbnb with Luke's diner images (you can print out the "No Cell Phones" sign online for free).  And the first night in NOLA was spent ordering hella takeout and watching all the wedding/bach-themed Gilmore Girls episodes (the airbnb we stayed in had Netflix!)  Always over-order food, that is the Gilmore way.  Also, its a really good idea for bachelorette weekends anyway because leftovers are a great late night snack.




5.10.2017

Nautical-Themed Photo Backdrop

Ahoy!  I used striped wrapping paper and masking tape to create a photo backdrop for a nautical themed photo backdrop.  I was considering making a stand out of pvc pipe, but ran out of time.  I made the banner as well, using the same style I used for the Cabo trip, except I put them on bunting.


I thought it was missing something, so I decided to make some 3-D waves using foam board and blue tissue paper.  This probably took more time to make than the backdrop, but that's because I was kind of figuring it out as I went along.  I used one foam board and had to figure out how to make it into a pair of waves, so I split it on the diagonal and traced out waves with a pencil.  I knew I didn't want to deal with paint, but I did have a LOT of tissue paper lying around in various shades of blue.  So I cut them into wavy strips using a rotary cutter and glued them in overlapping layers in an ombre design.  I liked how the tissue paper wasn't exactly opaque, so each layer kind of shows underneath the one below it.  It just created a cool texture to it, and I was really proud of it!  If I had more time, I would have probably glitter mod podged it (because, duh) but I literally finished it the day before.

5.05.2017

DIY Letter Pinatas

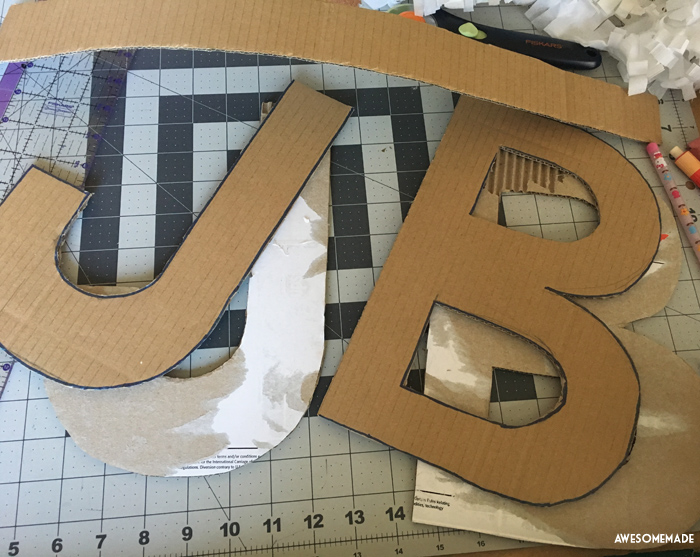
Continuing on with these wedding craft projects,  I made a DIY pinata for a texmex-themed wedding shower.  I've seen diy pinatas trending on Pinterest recently, so I was excited to take on this project.  Honestly, I would've attempted a pinata regardless of the theme.  All I used was leftover cardboard boxes, tissue paper (green because of cacti), masking tape, and lots of glue.  Making fringe out of tissue paper is one of my favorite things to do, apparently.  The gluing on of the fringe was probably my least favorite, though.  I decided to string everything on some twine so that we can hang it like a banner, rather than hang it like an actual pinata.  I filled it with leftover packing material, rather than with candy.  You can totally fill it with candy, but I didn't want people to destroy it after I took the time to make it. lol.

Total cost: $1 for the pack of tissue paper, and the rest I had on hand.


Some other stuff I crafted for the shower include lucha libre game tags for the game prizes and wrapped up some pretty cacti for the game prizes!


3.17.2017

Bachelorette Letter Banner and Tassle Garland

This is the year of weddings apparently, so I've been taking them as an opportunity to create some fun stuff for my friends.  I recently went to Cabo for a bachelorette trip and decorated our lovely (gorgeous, really) airbnb.  Used mint and white tissue paper for the tassles, and made the letters by tracing letter cutouts (that I bought for the intended purpose of making letter banners) onto some cardstock that I had laying around (I have a lot of craft stuff laying around!).  Made the the letter banner and measured and cut the tissue paper the night before. Having a rotary cutter made everything easier and I am definitely addicted to making fringe now.  I placed the prepped tissue paper in a ziplock bag and created the tassles at the airport gate.  You can craft anywhere, you guys!


I loved our airbnb!!


A lot of my upcoming crafts are wedding related, which will probably be helpful for the Pinterest people out there.  My current crafting interest which I am actually putting off though is sewing a dress from a pattern.  I've bought the patterns but haven't bought the fabric yet.  It's kind of daunting, so I'm procrastinating but hopefully I find a fabric that will inspire me to start the project.  I really want to work on my sewing skills, and I think this would be good challenge.

12.23.2016

Adventures in Pattern Making - Fleece-lined Dog Jacket

One of my goals next year craft-wise is to become more comfortable with my sewing machine.  I even started buying some dress patterns with the goal to successfully make my own dress in 2017.  I haven't started them yet, because it's kinda intimidating. But I did make this jacket for my dog. I've made my dog a jacket before, it's not something new.  I even made one using a purchased pattern.  But I wasn't truly satisfied with the outcome and I knew I wanted to try it again and improve.  I figured making a jacket for my dog would be a small step towards making an entire dress for me (less fabric, less time dedicated to it, less commitment), so here's what I did.

There's this jacket that I bought my dog years ago that is my favorite on him.  I wanted to base this project on that specific style.  It has more coverage on the dog's front  section compared to those jackets that just wrap around the neck and then around the body. Anyways, I've made a pattern before using this jacket, but it didn't have any lining on it and I used snap buttons when I should've used velcro.  So I decided to re-do the pattern to make it fit him better (so I can use it for future jacket-making) and then add to the overall quality of the piece with fleece lining! And velcro closures!  And lengthening the coat for added modesty*!  So technically it's two projects in one (making the pattern and then making the jacket with that pattern.)

I was able to get both fabrics in the remnants section of Joann's. That's the beauty of having a 12-lb dog: you don't need yards of fabric.  I was lucky to find this flannel in this print, I think it looks great on him.  I might even have enough leftover to make a matching cowl for me.  It wouldn't be the first time.

Anyways, look how caaaa-yoooote:


The cute fleece collar is also the material used for the lining inside.  I bought black bias tape and was happy with the contrast.  Next time I'm going to try and make my own bias.  Because custom details, yaaas.


*okay, that was a joke.  but no dog looks flattering in a crop top.

11.02.2016

Dog Breading Last Minute Dog Costume

Made this the night before halloween. hehe.


The best thing since...
 

Hope you had a Happy Halloween

10.20.2016

Knitted Beanie

It's that time of the year!  Knitting season!  Well kinda, its currently 62 degrees and sunny while I'm typing this up.  But when I knitted up this beanie last weekend, it was super rainy and perfect weather for knitting (and Netflix!).  This was a quick knit, thanks to the extra chunky weight of this yarn.  I'm actually really proud of this one because I didn't use any specific pattern and kind of made it up as I went along.  It's the first time I've ever did that, and I didn't have to unravel and redo anything, which is what I was bracing myself for.  I tried my best to jot down what I did, so that I can make it again in different colors.  Writing up patterns is a project in itself.  I have a better appreciation for people who do that.  It's basically another language, no?  Some people complain about having to pay for patterns rather than getting them for free online.  But a lot of work goes into pattern-making, yo.  Respect the creator.  Anyways, I'm probably going to keep making these since they're super easy and quick to knit.  I love chunky yarn!


Are dpns too old school?  I didn't want to buy circular needles in the size I needed.


Used the knit 2 together on the decrease rows, which will show a visible slant to the right on the decrease stitches.

Upcoming projects in mind inspired by this project: DIY stitch markers, creating my own patterns for knitted/crocheted projects.